Colab
全名Colaboratory,是由谷歌提供的免费的云平台,使用方便,无需在本地安装TensorFlow,keras等框架就可以进行深度学习
配置
Google Drive账号授权
关联你的Google Drive,完成授权后,你可以想象登录了一台服务器,并可以在这台服务器上执行Linux指令。与Jupyter类似,以文档的形式展现,可以运行和共享代码。每一个ipynb文件都存储在Google Drive文件夹下,写完的文件可以上传或共享至github上,github上的数据或者py文件也可以导入,是一个非常方便的平台。
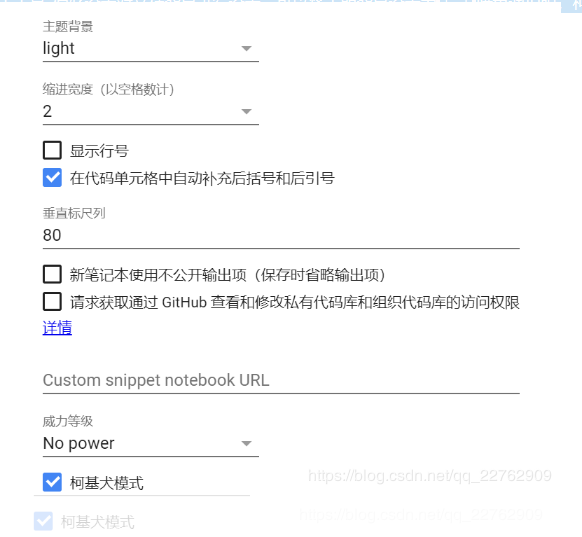
改变背景风格
可以在菜单栏点击工具-偏好设置对文档背景进行设置,可以将主题背景设置为dark暗色调护眼,柯基犬模式是在菜单栏出现跑步的柯基,非常有意思。
使用GPU/TPU
使用GPU/TPU能够提升训练网络的速度,在菜单栏点击修改-笔记本设置即可改变硬件配置,一般选择GPU模式。
基础指令
colab与linux环境指令类似,仅需要在指令前添加“!”即可,本节提供一些入门的
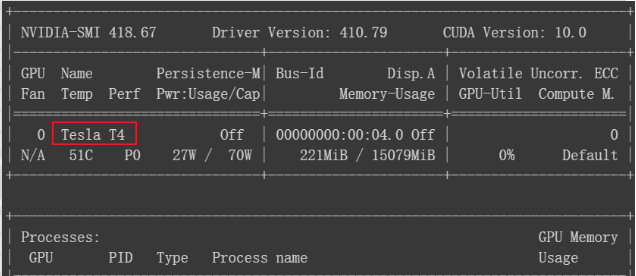
查看显卡硬件信息
在主界面新建代码块输入如下指令便可查询显卡信息
!nvidia-smi1
从下图可以看出显卡已经从K80更新为Tesla T4
导入数据
再colab环境下导入数据一般有三种办法:
1.直接上传文件
2.上传Google Drive并挂载导入
3.从github仓库下载导入
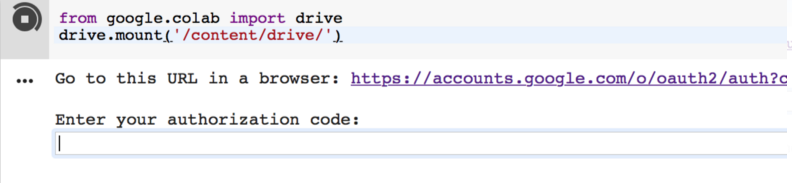
对于第一种方法不推荐,因为分配的云服务器是暂时的,断开连接后空间释放,数据文件直接消失,下次连接的新服务器不会保留数据文件。因此建议使用第二种方法,将数据文件上传到Google Drive中,使用如下代码挂载Google Drive读取数据,这样不会存在数据丢失的情况。
from google.colab import drive
drive.mount('/content/drive')
!ls
代码运行后在下方会出现链接,点击链接登录会出现验证码,复制粘贴到方框内便能在文件目录下挂载Google Drive文件夹,读取数据。
返回你Google Drive主目录下的所有文件夹
!ls "/content/drive/My Drive/"
第三种办法
上传数据集到git上面之后,就可以在Colab中使用下面这一行代码将我们的数据导入到Colab的虚拟机中(虚拟的Linux文件系统)。下面的这个https://gitlab.com/liangyihuai/cats_and_dogs_small.git是点击上图中蓝色的Clone按钮之后获取的。
! git clone https://gitlab.com/liangyihuai/cats_and_dogs_small.git
使用下面命令查看我们所导入的数据
! ls
查看系统已安装包
使用如下代码变可查看已经安装的python包
!pip list
安装新包
使用如下代码变可安装新python包(假设matplotlib未安装)
!pip install matplotlib
安装keras
!pip install -q keras
配置工作目录
假设你在HW2文件夹内,创建一个新的deep_learning_HM.ipynb文件
Colab不会把你的路径设为你创建文件时所在的路径,而是使用默认路径"/content’,当你想加载dataset.csv.npy文件时,会报错
因此你需要主动设置工作路径
import os
os.chdir("/content/drive/My Drive/HW2")
运行.py文件
安装必要库
输入相应代码,并执行(crtl+F9)
!apt-get install -y -qq software-properties-common python-software-properties module-init-tools
!add-apt-repository -y ppa:alessandro-strada/ppa 2>&1 > /dev/null
!apt-get update -qq 2>&1 > /dev/null
!apt-get -y install -qq google-drive-ocamlfuse fuse
from google.colab import auth
auth.authenticate_user()
from oauth2client.client import GoogleCredentials
creds = GoogleCredentials.get_application_default()
import getpass
!google-drive-ocamlfuse -headless -id={creds.client_id} -secret={creds.client_secret} < /dev/null 2>&1 | grep URL
vcode = getpass.getpass()
!echo {vcode} | google-drive-ocamlfuse -headless -id={creds.client_id} -secret={creds.client_secret}
运行后,会出现以下提示

先点开相应的链接,选择自己的谷歌账号,并允许,最后会得到相应的代码,输入相应的框中即可
挂载云端硬盘
同上,输入下面命令,执行即可
!mkdir -p drive!google-drive-ocamlfuse drive -o nonempty
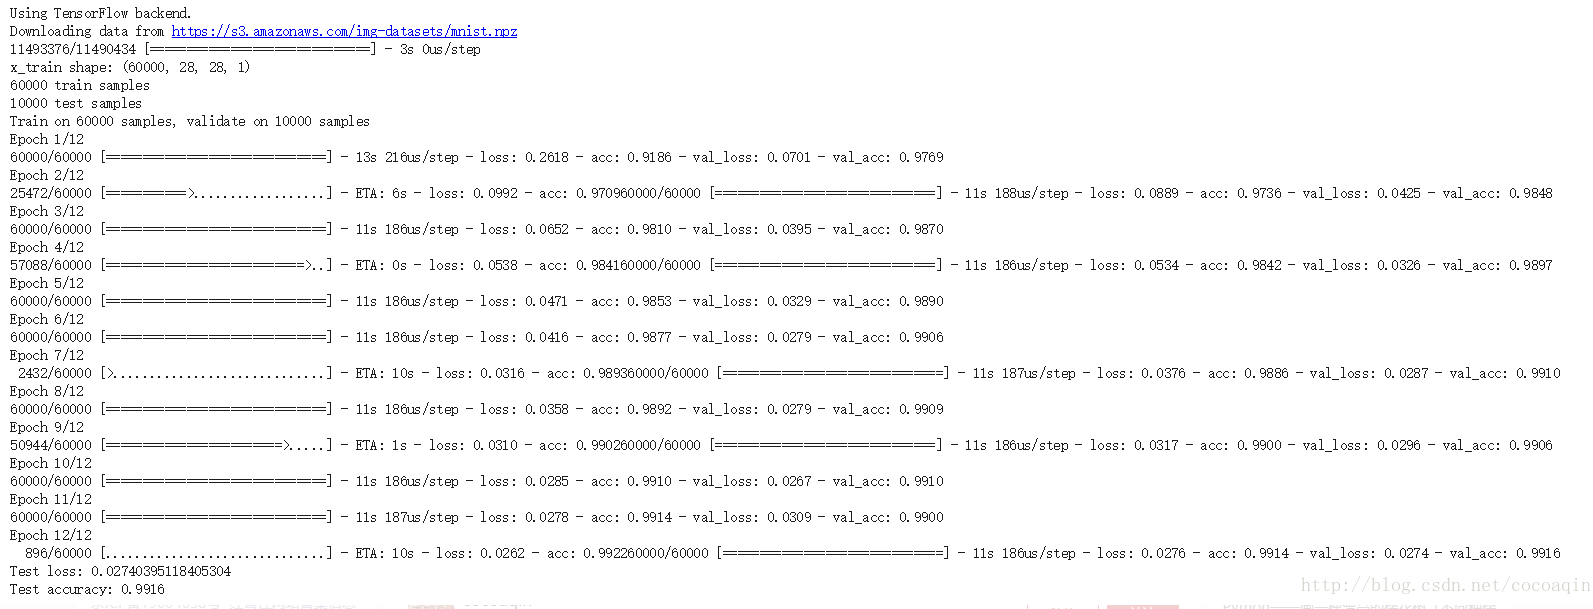
Hello Mnist!
将代码粘入jupyter笔记本中,运行,即可开始奇妙的Google Colab之旅
代码摘自:https://github.com/keras-team/keras/blob/master/examples/mnist_cnn.py
'''Trains a simple convnet on the MNIST dataset.
Gets to 99.25% test accuracy after 12 epochs
(there is still a lot of margin for parameter tuning).
16 seconds per epoch on a GRID K520 GPU.
'''
from __future__ import print_function
import keras
from keras.datasets import mnist
from keras.models import Sequential
from keras.layers import Dense, Dropout, Flatten
from keras.layers import Conv2D, MaxPooling2D
from keras import backend as K
batch_size = 128
num_classes = 10
epochs = 12
# input image dimensions
img_rows, img_cols = 28, 28
# the data, shuffled and split between train and test sets
(x_train, y_train), (x_test, y_test) = mnist.load_data()
if K.image_data_format() == 'channels_first':
x_train = x_train.reshape(x_train.shape[0], 1, img_rows, img_cols)
x_test = x_test.reshape(x_test.shape[0], 1, img_rows, img_cols)
input_shape = (1, img_rows, img_cols)
else:
x_train = x_train.reshape(x_train.shape[0], img_rows, img_cols, 1)
x_test = x_test.reshape(x_test.shape[0], img_rows, img_cols, 1)
input_shape = (img_rows, img_cols, 1)
x_train = x_train.astype('float32')
x_test = x_test.astype('float32')
x_train /= 255
x_test /= 255
print('x_train shape:', x_train.shape)
print(x_train.shape[0], 'train samples')
print(x_test.shape[0], 'test samples')
# convert class vectors to binary class matrices
y_train = keras.utils.to_categorical(y_train, num_classes)
y_test = keras.utils.to_categorical(y_test, num_classes)
model = Sequential()
model.add(Conv2D(32, kernel_size=(3, 3),
activation='relu',
input_shape=input_shape))
model.add(Conv2D(64, (3, 3), activation='relu'))
model.add(MaxPooling2D(pool_size=(2, 2)))
model.add(Dropout(0.25))
model.add(Flatten())
model.add(Dense(128, activation='relu'))
model.add(Dropout(0.5))
model.add(Dense(num_classes, activation='softmax'))
model.compile(loss=keras.losses.categorical_crossentropy,
optimizer=keras.optimizers.Adadelta(),
metrics=['accuracy'])
model.fit(x_train, y_train,
batch_size=batch_size,
epochs=epochs,
verbose=1,
validation_data=(x_test, y_test))
score = model.evaluate(x_test, y_test, verbose=0)
print('Test loss:', score[0])
print('Test accuracy:', score[1])
总结
在使用Colab时,每一个ipynb文件都先执行以下代码
from google.colab import drive
drive.mount('/content/drive/')
import os
os.chdir("/content/drive/My Drive/YourWorkPath")

![08001-命名通道提供程序:无法打开与SQL Server的连接[53] 08001-命名管道提供程序:无法打开与SQL Server的连接[1326] 数据库连接不上提示08001](http://www.zhaoyongjie.cn/zb_users/upload/2017/05/201705171495010582973799.png)


评论列表